How to
remove fields
from your contact form
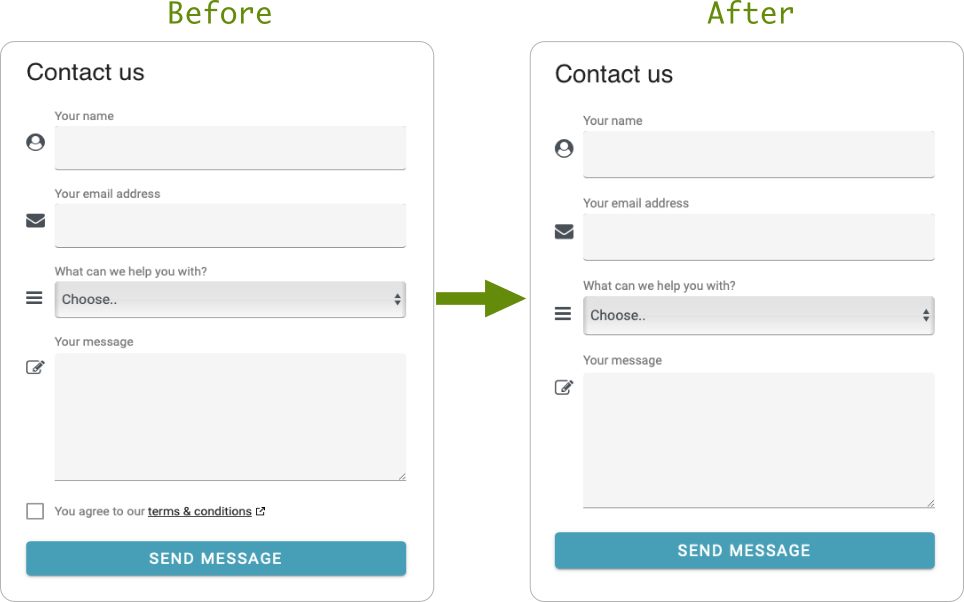
In this guide we will show you how to remove a field from your contact form. In another guide, we explained how to add a new field to your contact form.
As an example, we'll remove the "terms & conditions" checkbox field and it's validation from a contact form. The same process can apply to other fields in the form.
Important: Please take a back-up copy of your form before making any changes, that way you can restore the form if you run into trouble.
- Remove the form field from the HTML file
- Remove the form field validation from the JavaScript file
- Remove the form field from the PHP file
Remove a field from the HTML file
Here's the existing HTML form code field to remove.
contact-form.htm
<div class="fcf-checkbox">
    <label>
        <input name="Agree" type="checkbox" data-validate-field="Agree"><i class="helper"></i> You agree
        to our <a href="" onclick="tc()" class="fcf-newwindow">terms & conditions</a>
    </label>
</div>
Locate and remove the above code from your form.
Remove the form field validation from the JavaScript file
Next, the validation rule needs to be removed otherwise when the forms button is pressed an error will occur.
Here are the existing validation rules
fcf-assets/js/contact-form.js (only the validation parts are shown below)
rules: {
        Name: {
            required: true,
            minLength: 2,
            maxLength: 60
        },
        Email: {
            required: true,
            email: true
        },
        Subject: {
            required: true,
            minLength: 2,
            maxLength: 100
        },
        Message: {
            required: true,
            minLength: 15,
            maxLength: 3000
        },
        Agree: {
            required: true
        }
    },
The "Agree" rule is the one to remove. Your rules should now look like the following.
rules: {
        Name: {
            required: true,
            minLength: 2,
            maxLength: 60
        },
        Email: {
            required: true,
            email: true
        },
        Subject: {
            required: true,
            minLength: 2,
            maxLength: 100
        },
        Message: {
            required: true,
            minLength: 15,
            maxLength: 3000
        }
    },
That's all that's needed to remove this field. However, if you're removing a different field then one additional step in required (see below).
Remove the form field from the PHP file
Please note that this part is not needed for the "terms & conditions" field.
In this example, we're going to remove the validation rule for "CompanyName" (you may not have this field, it's just an example) from the PHP file.
In the configuration of the form, which is a PHP file, we need to remove the field from two separate parts. The first is used for validation, the second is the friendly name mapping.
Part 1 - Validation rule
fcf-assets/contact-form.config.php (only the parts we're changing are shown below)
// *********************
// FORM FIELD VALIDATION
// *********************
$validate = array(
    "Name" => "NOT_EMPTY,2,60",
    "Email" => "EMAIL",
    "CompanyName" => "NOT_EMPTY,2,100",
    "Message" => "NOT_EMPTY,15,3000"
);
Here's the part we want to remove.
"CompanyName" => "NOT_EMPTY,2,100",
Here's the updated validation code which now excludes the field.
// *********************
// FORM FIELD VALIDATION
// *********************
$validate = array(
    "Name" => "NOT_EMPTY,2,60",
    "Email" => "EMAIL",
    "Message" => "NOT_EMPTY,15,3000"
);
Part 2 - Friendly name
fcf-assets/contact-form.config.php (only the parts we're changing are show below)
// ******************
// FORM FIELD MAPPING
// ******************
$mapping = array(
    "Name" => "Your name",
    "Email" => "Your email address",
    "CompanyName" => "Your company name",
    "Message" => "Your message"
);
Here's the part we want to remove.
"CompanyName" => "Your company name",
Here's the updated validation code which now excludes the field.
// ******************
// FORM FIELD MAPPING
// ******************
$mapping = array(
    "Name" => "Your name",
    "Email" => "Your email address",
    "Message" => "Your message"
);
Congratulations, your updated form is now ready to use!
It's recommended to test your changes out on in a hidden area of your website before making it publicly available.