How to
add new fields
and extend your contact form
In another guide, we explained how to remove a field from your contact form, in this guide we'll show you how to add a new field to an existing HTML contact form, along with validation in the JavaScript (client-side) and validation in the PHP (server-side). Then we'll show you how to include the new field into your email message.
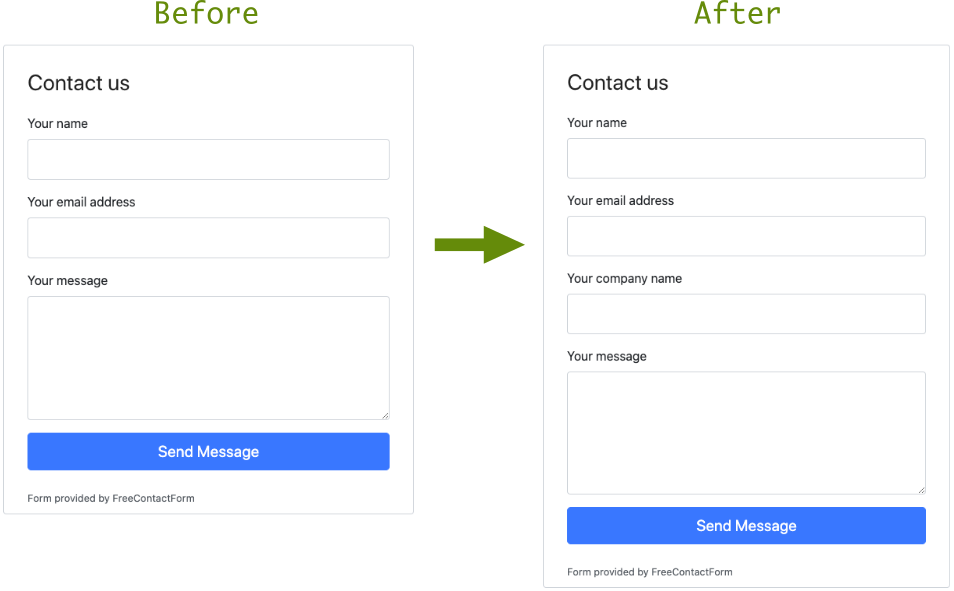
For this example, we'll add a new "Company name" field to an existing contact form. The existing form contains "Name", "Email" and "Message", we're going to add "Company name" between the email and message fields. We'll also make this a required field.
- Add a new form field to the HTML file
- Add a new form field to the JavaScript file
- Add a new form field to the PHP file
- Add a new form field to your email message
Add a new form field to the HTML file
Here's the existing HTML form code without any modification.
contact-form.htm
<form id="fcf-form-id" class="fcf-form-class-free" method="post" action="fcf-assets/contact-form.process.php">

    <div class="fcf-form-group">
        <label for="Name" class="fcf-label">Your name</label>
        <div class="fcf-input-group">
            <input type="text" id="Name" name="Name" class="fcf-form-control" data-validate-field="Name">
        </div>
    </div>

    <div class="fcf-form-group">
        <label for="Email" class="fcf-label">Your email address</label>
        <div class="fcf-input-group">
            <input type="email" id="Email" name="Email" class="fcf-form-control" data-validate-field="Email">
        </div>
    </div>

    <div class="fcf-form-group">
        <label for="Message" class="fcf-label">Your message</label>
        <div class="fcf-input-group">
            <textarea id="Message" name="Message" class="fcf-form-control" rows="6" data-validate-field="Message" maxlength="3000"></textarea>
        </div>
    </div>

    <div id="fcf-status" class="fcf-status"></div>

    <div class="fcf-form-group">
        <button type="submit" id="fcf-button" class="fcf-btn fcf-btn-primary fcf-btn-lg fcf-btn-block">Send Message</button>
    </div>

</form>
As stated before, we want to insert a new "Company name" field between the email and message fields. To keep with the design of the form, we'll give this new field a label value "Your company name".
Here's the new field HTML we want to add:
    <div class="fcf-form-group">
        <label for="CompanyName" class="fcf-label">Your company name</label>
        <div class="fcf-input-group">
            <input type="text" id="CompanyName" name="CompanyName" class="fcf-form-control" data-validate-field="CompanyName">
        </div>
    </div>
In the above code, take note of the labels "for" value which is "CompanyName", you will notice that this matches the input fields "id", "name" and "data-validate-field" values. They all need to match exactly.
Now let's put the new field into the existing form code.
<form id="fcf-form-id" class="fcf-form-class-free" method="post" action="fcf-assets/contact-form.process.php">

    <div class="fcf-form-group">
        <label for="Name" class="fcf-label">Your name</label>
        <div class="fcf-input-group">
            <input type="text" id="Name" name="Name" class="fcf-form-control" data-validate-field="Name">
        </div>
    </div>

    <div class="fcf-form-group">
        <label for="Email" class="fcf-label">Your email address</label>
        <div class="fcf-input-group">
            <input type="email" id="Email" name="Email" class="fcf-form-control" data-validate-field="Email">
        </div>
    </div>

    <div class="fcf-form-group">
        <label for="CompanyName" class="fcf-label">Your company name</label>
        <div class="fcf-input-group">
            <input type="text" id="CompanyName" name="CompanyName" class="fcf-form-control" data-validate-field="CompanyName">
        </div>
    </div>

    <div class="fcf-form-group">
        <label for="Message" class="fcf-label">Your message</label>
        <div class="fcf-input-group">
            <textarea id="Message" name="Message" class="fcf-form-control" rows="6" data-validate-field="Message" maxlength="3000"></textarea>
        </div>
    </div>

    <div id="fcf-status" class="fcf-status"></div>

    <div class="fcf-form-group">
        <button type="submit" id="fcf-button" class="fcf-btn fcf-btn-primary fcf-btn-lg fcf-btn-block">Send Message</button>
    </div>

</form>
Add a new form field to the JavaScript file
Now that the HTML part is ready, let's now focus on adding the field validation to the JavaScript file.
fcf-assets/js/contact-form.js (only the validation parts are shown below)
rules: {
    Name: {
        required: true,
        minLength: 2,
        maxLength: 60
    },
    Email: {
        required: true,
        email: true
    },
    Message: {
        required: true,
        minLength: 15,
        maxLength: 3000
    }
},
In the above, you can see the 3 existing validation rules. We are going to add a new one for the new "CompanyName" field.
    CompanyName: {
        required: true,
        minLength: 2,
        maxLength: 100
    }
In this new rule, you can see that it's set to "required" as the value is "true". It requires a minimum of 2 characters and a maximum of 100 to be entered (edit these values as desired).
Bonus note: If you want the field to be optional, but if data is entered it should have between 2 and 100 characters entered, then simply change the required value to "false".
Now let's put the new validation rule into the existing validation rules code.
rules: {
    Name: {
        required: true,
        minLength: 2,
        maxLength: 60
    },
    Email: {
        required: true,
        email: true
    },
    CompanyName: {
        required: true,
        minLength: 2,
        maxLength: 100
    },
    Message: {
        required: true,
        minLength: 15,
        maxLength: 3000
    }
},
Add a new form field to the PHP file
In the configuration of the form, which is a PHP file, we need to add the field to two separate parts. The first is for the validation, the second is to allow you to provide a user-friendly name.
Part 1 - Validation rule
fcf-assets/contact-form.config.php (only the parts we're changing are shown below)
// *********************
// FORM FIELD VALIDATION
// *********************
$validate = array(
    "Name" => "NOT_EMPTY,2,60",
    "Email" => "EMAIL",
    "Message" => "NOT_EMPTY,15,3000"
);
Here's the new part we want to add.
"CompanyName" => "NOT_EMPTY,2,100",
Here's the updated validation code which now includes the new field.
// *********************
// FORM FIELD VALIDATION
// *********************
$validate = array(
    "Name" => "NOT_EMPTY,2,60",
    "Email" => "EMAIL",
    "CompanyName" => "NOT_EMPTY,2,100",
    "Message" => "NOT_EMPTY,15,3000"
);
Part 2 - Friendly name
fcf-assets/contact-form.config.php (only the parts we're changing are shown below)
// ******************
// FORM FIELD MAPPING
// ******************
$mapping = array(
    "Name" => "Your name",
    "Email" => "Your email address",
    "Message" => "Your message"
);
Here's the new part we want to add.
"CompanyName" => "Your company name",
Here's the updated validation code which now includes the new field.
// ******************
// FORM FIELD MAPPING
// ******************
$mapping = array(
    "Name" => "Your name",
    "Email" => "Your email address",
    "CompanyName" => "Your company name",
    "Message" => "Your message"
);
This user-friendly name is needed only if the client-side validation fails (maybe the browser has JavaScript switched off) and the server-side validation finds a validation issue. The issue is reported back to the screen and this is where the friendly name is used. It's better to show this that "CompanyName".
Now, the work on the form is complete and ready to go. However, you still need to provide a way for this new field to show in the email it'll generate, so read on.
Add a new form field to your email message
Emails are generated by combining a template file with the data submitted from the form. We're now going to add the new field to the email templates.
There are two templates, one for HTML and the other for TEXT. Most email clients support HTML, but TEXT is used as a fallback. Emails are sent multipart with HTLM as the default and text as the alternative.
Part 1 - HTML template
fcf-assets/templates/contact-form.email-in.htm (only part of the template shown below)
<tr>
    <td style="color: #153643; font-family: Arial, sans-serif; font-size: 14px;">
        {Message}
    </td>
</tr>
<tr>
    <td style="font-size: 12px;">
        <br>
    </td>
</tr>
<tr>
    <td style="color: #153643; font-family: Arial, sans-serif; font-size: 12px;">
        {Name} - {Email}
    </td>
</tr>
The above is part of the HTML template which has placeholders set for "Message", "Name" and "Email". These placeholders are swapped out with the form data.
Here's the new part with a placeholder for "CompanyName". You may want to format this different from this example.
<tr>
    <td style="color: #153643; font-family: Arial, sans-serif; font-size: 14px;">
        {CompanyName}
    </td>
</tr>
<tr>
    <td style="font-size: 12px;">
        <br>
    </td>
</tr>
Here are both parts together
<tr>
    <td style="color: #153643; font-family: Arial, sans-serif; font-size: 14px;">
        {Message}
    </td>
</tr>
<tr>
    <td style="font-size: 12px;">
        <br>
    </td>
</tr>
<tr>
    <td style="color: #153643; font-family: Arial, sans-serif; font-size: 14px;">
        {CompanyName}
    </td>
</tr>
<tr>
    <td style="font-size: 12px;">
        <br>
    </td>
</tr>
<tr>
    <td style="color: #153643; font-family: Arial, sans-serif; font-size: 12px;">
        {Name} - {Email}
    </td>
</tr>
Part 2 - TEXT template
fcf-assets/templates/contact-form.email-in.txt
{Message}


{Name} - {Email}
the new field
{CompanyName}
Both together
{Message}

{CompanyName}

{Name} - {Email}
Congratulations, your extended form, and email templates are now ready to use!
It's recommended to test your changes out on in a hidden area of your website before making it publicly available.